I'd been toying for a while with the idea of converting one of my Canon EOS DSLR bodies to infrared - this involves removing the infrared blocking filter from the CMOS sensor and effectively turning the camera into a full-spectrum capture device (there are various options - full-spectrum - IR+UV+visible light, IR+visible light, IR-only; depending on what the IR blocking filter is replaced with). The problem is that it is fiddly work to do yourself (open-heart surgery on your precious camera), or expensive to have done, and pretty much irreversible (unless you have very deep pockets). After a lot of thought, I decided that the gimmick (of playing around with visual effects) was not worth the outlay.
Instead, I dug out an old film camera (my wife's old Pentax K1000), and loaded it with some ASA 400 IR B&W film I sourced on eBay, and purchased a suitable IR filter for the lens - oh, and not forgetting a remote shutter release cable - you need long exposures for IR photography!
Snow isn't really suited for the IR treatment, as best results are achieved by photographing subjects that reflect or radiate in the infrared spectrum - lush vegetation, clear skies; as opposed to absorbing IR (cloudy sky, bare trees, snow cover). But the scenery looked gorgeous, it had actually *stopped* snowing, and I had a spare few hours, so I grabbed my kit (including a sturdy tripod) and sallied forth.
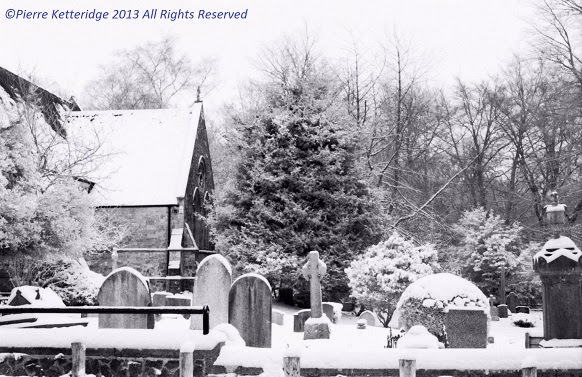
These two photos are of The Church of the Holy Innocents, High Beach. The image on the left is unfiltered, shot at ASA/ISO400, f/8, 125th second. Unfiltered, it comes out pretty much identical to a standard B&W ASA400 film image (the IR spectrum will have been captured, but obliterated by the visible light). The one on the right was taken with an IR72 filter, ASA/ISO20, f/2.8-4, 1/8th second.
It takes a while to get the hang of this... you need long exposures (slow shutter speed), low ISO, wide aperture to catch as much light as possible, while blocking off all visible light with the IR72 filter. This also means you have to frame and focus without being able to see your shot through the viewfinder (you can frame and compose first without the filter, but focus in the 700-1000 nanometre spectrum is slightly offset, so long shots with a focus just dialled back from infinity seem to work best). A tripod and remote shutter cable are essential.
The results were quite interesting, although the visual effects aren't quite as stunning as I'd hoped (for the spectral absorption/reflection reasons explained above). I still have a couple of rolls stored in the fridge, and will try again when the forest is in its verdant spring glory! I found the IR gives an eerie, ghostly effect, and that brickwork and tree bark details are greatly enhanced. Here are a selection - judge for yourself:
IR72 filter, ASA/ISO20, f/2.8-4, 1/8th second

IR72 filter, ASA/ISO20, f/2.8-4, 1/8th second
IR72 filter, ASA/ISO20, f/2.8-4, 1/8th second
With spare son for scaling. Ben's wellies seem the most solid part of him! No idea what the horizontal line in the top third of the picture is - it doesn't appear in any other images. Can anybody cast any light?


No comments:
Post a Comment